Introduction
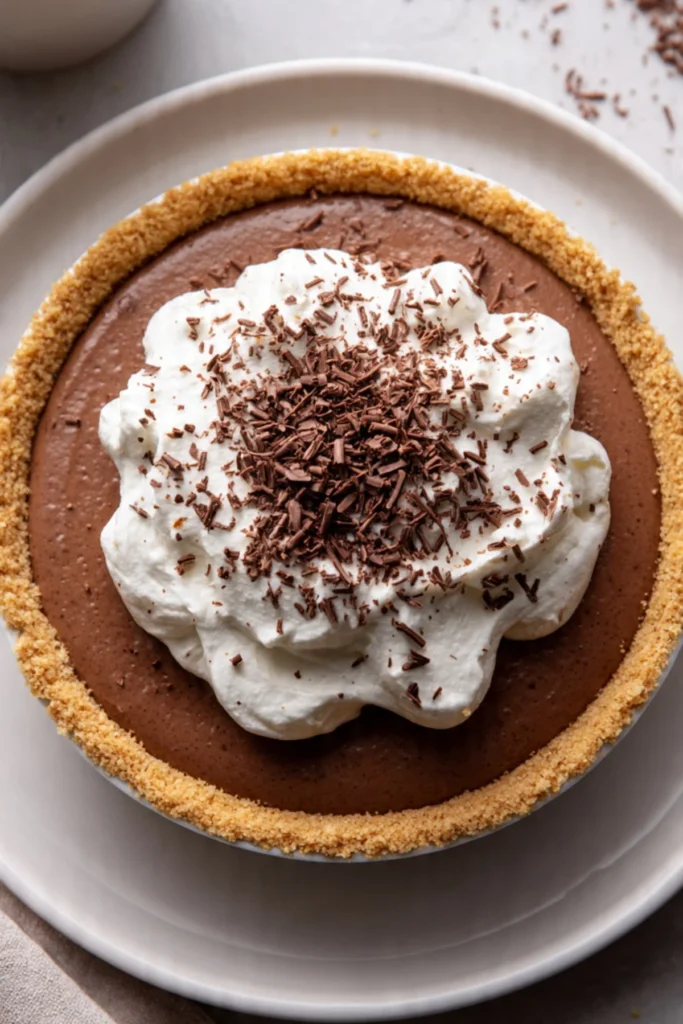
There’s something almost cinematic about the first spoonful of a chocolate pudding pie — the cool, silky pudding giving way under a gentle fork, the crumbly graham cracker crust offering a toasty, buttery counterpoint, and a whisper of grated chocolate melting on your tongue. The aroma is simple but irresistible: sweet cocoa warmed by the faint scent of graham and butter. It’s a dessert that feels like a hug from your childhood yet elegant enough for today’s dinner table.
This no-bake pudding pie is perfect for lazy weekend afternoons, potlucks when you want something hassle-free, or as a quick finish to a weeknight meal. If you’re a fan of classic chocolate pies, you might also enjoy this tried variation on a similar theme: a chocolate pudding pie that explores slightly different crust and topping choices.
Dish Snapshot
- Prep Time: 15 minutes
- Cook Time: 0 minutes (no-bake)
- Total Time: 2 hours 15 minutes (includes chilling time)
- Servings: 8 slices
- Difficulty Level: Easy — ideal for beginner bakers and busy hosts
Nutrition Highlights
Per serving (1/8 of pie). These are estimated values calculated from typical ingredient nutrition profiles (graham cracker crust, prepared chocolate pudding from a 3.4 oz mix with 2 cups whole milk, whipped cream topping, and grated chocolate) using USDA FoodData Central entries and standard product labels; daily-value context references from CDC guidance. Individual packaged products will vary—check labels for precise numbers.
- Calories: ~340 kcal
- Protein: ~5 g
- Carbohydrates: ~42 g
- Fat: ~17 g
- Saturated Fat: ~10 g
- Fiber: ~1 g
- Sugars: ~27 g
- Sodium: ~220 mg
- Cholesterol: ~50 mg
Notes: These are approximate figures intended to help with meal planning. For people tracking specific nutrients (sodium, saturated fat, sugars, etc.), consult product labels and consider swapping lower-fat milk or reduced-sugar pudding mixes. Trusted sources for general nutrition guidance include the CDC and USDA FoodData Central.
Why You’ll Love It
This pudding pie excels for a few key reasons:
- Comfort in a flash: silky, chocolatey filling and a crunchy crust deliver immediate satisfaction with very little hands-on time.
- Crowd-pleasing: chocolate is almost universally loved, and this pie travels well to parties and potlucks.
- Memory-making: the flavors evoke homey, nostalgic desserts without the fuss of rolling pastry or baking.
- Versatile: easy to tweak—make it lighter, richer, or more adventurous with a few simple swaps.
Preparation Guide
Ingredients
- 1 pre-made 9-inch graham cracker crust
- 1 package (3.4 oz) instant chocolate pudding mix
- 2 cups whole milk (substitute: 2% milk for lighter version, or unsweetened almond milk — texture will be thinner)
- 1 cup whipped cream (store-bought topping or freshly whipped heavy cream)
- 2 tablespoons grated chocolate or chocolate shavings for garnish
Optional ingredients and substitutions
- For a richer pie: use half-and-half or whole heavy cream instead of milk when preparing pudding.
- Light version: use low-fat milk and reduced-fat whipped topping.
- Gluten-free: use a gluten-free graham or cookie crust.
- Vegan: swap pudding mix for a vegan chocolate pudding mix or make a cornstarch-based chocolate custard with plant milk; use coconut whipped topping and a vegan crust.
Step-by-step Instructions
- Make sure your pre-made graham cracker crust is chilled and intact; set it on a flat surface. (No preheating required.)
- In a mixing bowl, whisk together the chocolate pudding mix and 2 cups of milk until it thickens — about 2 minutes of whisking; follow package timing for best results. Avoid overmixing once it starts to thicken to keep the pudding silky.
- Pour the thickened pudding mixture into the chilled graham cracker crust, smoothing it out with a spatula to fill the base evenly.
- Cover the pie loosely with plastic wrap and chill in the refrigerator for 2–3 hours to allow the pudding to fully set. Do not rush this step—proper chilling ensures a sliceable, firm filling.
- Just before serving, spread or pipe 1 cup whipped cream over the top and sprinkle with 2 tablespoons grated chocolate for decoration.
- Slice with a sharp knife dipped in hot water and wiped dry between cuts for clean slices; serve chilled.
Practical tips
- Use chilled milk for quicker setting and a firmer texture.
- If your pudding seems too loose after chilling, allow an additional hour in the fridge; for very thin puddings, fold in a bit of dissolved instant pudding or cornstarch slurry, heat briefly, then cool.
- When whipping cream, start with very cold cream and a chilled bowl for best volume.
Best Pairings
- Classic: A steaming espresso or dark-roast coffee cuts the sweetness and complements the chocolate.
- Cozy pairing: Serve with a cup of chai or black tea for a warming contrast.
- Fruity side: Fresh berries (raspberries or strawberries) on the side brighten each bite.
- Light alternative: Pair a small wedge with a scoop of vanilla bean ice cream for a grown-up sundae.
- If you want a lighter dessert option alongside this pie, consider offering a refreshing coconut chia pudding as a palate-friendly contrast.
Keeping it Fresh
- Room temperature: Because this pie contains dairy, do not leave it at room temperature for more than 2 hours (USDA food safety guideline).
- Refrigeration: Store covered in the refrigerator for 3–4 days. Keep the whipped cream topping sealed or add fresh topping before serving for best texture.
- Freezer: You can freeze the pie (without delicate whipped cream topping) for up to 1 month. Wrap tightly in plastic wrap and foil. Thaw overnight in the fridge; re-whip topping or use fresh whipped cream after thawing (texture may be slightly affected).
Pro Tips & Tricks
- Texture balance: The ratio of pudding to crust matters. Too much pudding and the slice collapses; too little and it feels dry. Stick to the quantities listed for optimal balance.
- Crust reinforcement: If your graham crust is very soft, brush a thin layer of melted chocolate along the bottom and chill for 10 minutes before filling—this creates a moisture barrier and adds richness.
- Whipped cream stability: For a firmer topping that holds up longer, fold a teaspoon of instant vanilla pudding mix into the whipped cream or use stabilized whipped cream (mix gelatin or use mascarpone).
- Presentation: For neat slices, chill until very firm and use a hot, clean knife for each cut.
Creative Twists
- Peanut Butter Swirl: Fold 1/2 cup of creamy peanut butter (warmed slightly) into half the pudding, layer it in the crust, and swirl for a peanut-chocolate riff. Top with chopped peanuts.
- Mint Chocolate: Add 1/2 teaspoon peppermint extract to the pudding mix for a mint-chocolate version. Garnish with crushed peppermint or Andes mint pieces.
- Salted Caramel Finish: Drizzle salted caramel sauce over the whipped cream and sprinkle flaky sea salt for a sweet-salty contrast.
- Gluten-free & Vegan: Use a gluten-free cookie crust, prepare a cocoa-cornstarch pudding with almond milk and maple syrup, and top with coconut whipped cream.
Frequently Asked Questions
Q: Can I use instant pudding made with skim milk for a lighter pie?
A: Yes—using lower-fat milk reduces calories but can make the filling slightly less silky. Chill longer for a firmer set.
Q: My pudding didn’t set after chilling. What can I do?
A: If it’s only slightly loose, let it chill longer. For significantly thin pudding made with low-fat or plant milk, you can stir in a small amount (1–2 tsp) of instant pudding mix or make a cornstarch slurry, heat until thick, cool, then pour into crust.
Q: How do I prevent the crust from getting soggy?
A: Chill the crust before filling and, if desired, paint a thin layer of melted chocolate on the inside and let it set—this creates a moisture barrier.
Q: Can I make this ahead for a party?
A: Yes—prepare the pie up to 2 days in advance and add the whipped topping just before serving for the freshest look.
Q: Is there a way to stabilize the whipped topping so it lasts longer on the table?
A: Yes—stabilize whipped cream by folding in a small amount of instant pudding mix, cream cheese, or softened mascarpone, or by using gelatin (dissolved and cooled) for longer hold.
Conclusion
This no-bake pudding pie proves that effortless desserts can still be show-stoppers: minimal hands-on time, maximum comfort, and endless room for creative twists. If you want a similar recipe with a slightly different take on the no-bake approach, check out this detailed No Bake Chocolate Pudding Pie – Meatloaf and Melodrama. For a seasonal Thanksgiving perspective and serving ideas that pair wonderfully with family gatherings, see this thoughtful Pudding Pie for Thanksgiving · Dinner: A Love Story.
Try the recipe, take a photo, and share your variations — I’d love to hear which twist becomes your new favorite.