
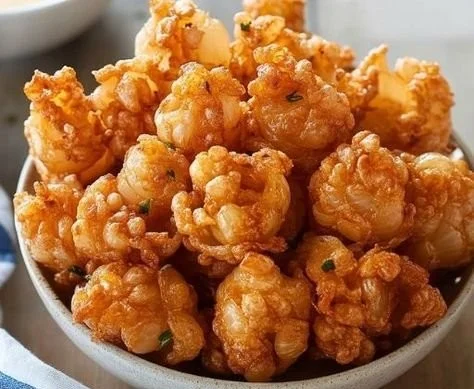
Crispy Mini Bloomin’ Onions with Buttermilk Ranch Dip
There’s something instantly comforting about the scent of onions blooming and frying—a warm, savory aroma that teases the senses and draws people to the kitchen. These bite-sized bloomin’ onions are crispy on the outside, tender and slightly sweet on the inside, and paired with a tangy, herb-forward buttermilk ranch, they hit every pleasurable texture and flavor note: crunch, creaminess, a hint of heat, and that mellow caramelized onion flavor. Serve them as an indulgent snack at game day, a playful starter for a dinner party, or as the star of a casual weekend gathering.
If you’re a dip person, you’ll love the creamy contrast of the ranch—try this version if you’re expanding your dip repertoire: creamy ranch chicken dip for inspiration and pairing ideas.
Dish Snapshot
- Prep Time: 1 hour 15 minutes (includes 1 hour buttermilk soak)
- Cook Time: 15 minutes (active frying in batches)
- Total Time: 1 hour 30 minutes
- Servings: 4 (one mini bloomin’ onion + portion of dip per person)
- Difficulty Level: Moderate (requires careful slicing and frying)
Nutrition Highlights
Nutrition information (per serving — one mini bloomin’ onion plus a generous portion of ranch dip). These values are estimates derived from ingredient-level data in USDA FoodData Central and general nutrition guidance from health sources such as the Mayo Clinic; actual values will vary by brands, oil absorption, and portion sizes.
- Calories: ~675 kcal
- Protein: ~6.5 g
- Carbohydrates: ~34 g
- Fat: ~57 g
- Fiber: ~2 g
- Sodium: variable (depends on mayo and added salt; estimate: 500–900 mg)
Notes: This appetizer is energy-dense because of the deep-frying and the mayonnaise-based dip. For lighter versions, see the variations section below. For diet or health-specific adjustments consult trusted sources like the CDC or your healthcare provider.
Why You’ll Love It
- Irresistible contrast: Crunchy, golden exterior with soft, sweet onion layers inside creates a satisfyingly textural bite.
- Shareable fun: Mini bloomin’ onions are playful and communal—perfect for gatherings where people graze and chat.
- Comfort food elevated: The familiar flavors of fried onion and ranch feel nostalgic yet special when presented as a “bloom.”
- Flexible timing: Soak the onions for an hour, then fry quickly when guests arrive—this recipe is adaptable to entertaining schedules.
Preparation Guide
Ingredients
- 4 small onions (choose firm, dry-skinned onions)
- 1 cup buttermilk (for soaking)
- 1 cup all-purpose flour
- 1 teaspoon garlic powder
- 1 teaspoon paprika
- 1/2 teaspoon cayenne pepper (adjust to taste)
- Salt and pepper to taste
- Oil for frying (vegetable, canola, or peanut oil recommended)
For the buttermilk ranch dip:
- 1 cup mayonnaise
- 1/2 cup sour cream
- 1 tablespoon dried dill
- 1 tablespoon garlic powder
- 1 tablespoon onion powder
- 1 tablespoon lemon juice
- Salt and pepper to taste
Optional ingredients and substitutions
- For a lighter dip: use low-fat Greek yogurt in place of sour cream and reduce mayonnaise by half.
- Gluten-free: substitute 1:1 gluten-free flour blend for the all-purpose flour.
- Vegan option: use plant-based mayonnaise and sour cream alternatives, and buttermilk can be made from plant milk + vinegar (note that frying results differ slightly).
- Spice variations: smoked paprika for a deeper smokiness, or add 1 tsp dried oregano for Mediterranean notes.
Step-by-step Instructions
- Slice the tops off the onions and peel them. Make 6–8 vertical cuts from near the root toward the top to form “petals,” leaving the root end intact so the layers stay together. Gently separate the layers to create the bloom.
- Submerge the prepared onions in buttermilk for at least 1 hour in the refrigerator to tenderize and help the coating adhere.
- In a mixing bowl, combine flour, garlic powder, paprika, cayenne pepper, salt, and pepper; whisk to blend.
- Heat oil in a deep fryer or a heavy pot to 350°F (175°C). Use enough oil for the onion to float without touching the bottom.
- Remove onions from buttermilk, shaking gently to remove excess. Coat each onion thoroughly in the flour mixture, making sure to separate the layers so the flour gets between the “petals.” Press flour into the layers for good adhesion.
- Carefully lower the onions into the hot oil (you may fry one at a time or two, depending on pot size). Fry until golden brown and crisp, about 4–5 minutes, turning gently if needed. Use a thermometer or visual cues—bubbling will calm and color will deepen when done.
- Drain the fried onions briefly on a wire rack or paper towels to remove excess oil.
- For the ranch dip, whisk together mayonnaise, sour cream, dried dill, garlic powder, onion powder, lemon juice, salt, and pepper until smooth. Chill for at least 15 minutes for flavors to meld.
- Serve immediately with the chilled buttermilk ranch.
Practical tips
- Keep the root intact when slicing; it acts as the anchor that makes the “bloom” possible.
- Separate onion layers gently with a small spoon or skewer before coating to ensure even flour coverage.
- Maintain oil temperature (350°F/175°C)—too cool and the onion will absorb excess oil and be greasy; too hot and the outside will burn before the inside is cooked.
- Fry in batches to avoid crowding the pot and lowering the oil temperature.
- For a crispier crust, double-dip: flour, back in buttermilk briefly, then flour again.
Best Pairings
- Serve with the buttermilk ranch as the primary accompaniment.
- Add a variety of dips: spicy sriracha mayo, smoky chipotle aioli, or a honey mustard for sweet-savory contrast.
- Pair with fresh, acidic sides like pickled vegetables or a light arugula salad to cut through the richness.
- For a heartier spread, set alongside sliders, garlic fries, or pasta—consider pairing with a rich cream pasta for a convivial meal (try a complementary recipe for a creamy pasta pairing in this cashew-based dish: creamy cashew alfredo with crispy anchovies).
Storage Instructions
- Room temperature: Best eaten immediately—ideally within a few hours. If left at room temperature, consume within 2 hours for food safety.
- Refrigeration: Store cooled, uncovered for no more than 1 hour to avoid sogginess; then place in an airtight container and refrigerate for up to 2 days. Re-crisp in a 375°F (190°C) oven for 8–10 minutes. The dip keeps in the refrigerator for 3–4 days.
- Freezer: Fried onions will not retain ideal texture after freezing and reheating; not recommended. The ranch dip can be frozen, but texture may change; up to 1 month in a freezer-safe container.
Pro Tips & Tricks
- Onion selection: Choose small, firm onions (like pearl or small yellow onions) for better bloom structure and easier handling. Large onions are harder to manage for mini blooms.
- Temperature cues: If oil smokes, it’s too hot—remove from heat and allow to cool. Ideal frying color is a deep golden brown.
- Texture balance: Let excess flour fall off before frying to avoid a floury taste; press coating gently into the layers for the best adhesion.
- Flavor layering: Season the flour well; the dry mix is where the savory exterior flavors come from. Add a little granulated sugar (1/2 tsp) to the flour if you want a subtle caramelizing boost during frying.
Creative Twists
- Gluten-free bloom: Use a 1:1 gluten-free flour mix and rice flour for extra crunch.
- Spicy honey glaze: After frying, toss blooms lightly with a warm honey-sriracha glaze for sweet-heat appeal.
- Baked version: For a lower-fat option, spray oiled blooms and bake at 425°F (220°C) for 20–30 minutes, flipping once, until edges are golden—texture will be different but still delicious.
- Cheese crust: Mix 1/4 cup finely grated Parmesan into the flour for a savory, umami lift.
- Vegan ranch: Use vegan mayo and cashew cream (blend soaked cashews with lemon and water) for a plant-based dip.
Recipe Q&A
Q: Can I make these ahead of time?
A: You can soak the onions in buttermilk up to 8 hours ahead and refrigerate; fry just before serving to retain maximum crispness.
Q: How can I reduce oil absorption?
A: Maintain correct oil temperature (350°F/175°C), fry in small batches, and avoid overcrowding the pan to keep the oil from cooling too much.
Q: Any tips to prevent the petals from breaking apart?
A: Keep the root end intact and slice conservatively (6–8 petals). Chill the onion briefly after slicing if the layers become too soft to handle.
Q: What’s a healthier dipping option?
A: Swap mayonnaise for low-fat Greek yogurt and reduce the mayo amount by half to cut calories while keeping creaminess.
Q: How do I re-crisp leftovers?
A: Reheat in a 375°F (190°C) oven on a wire rack for 8–10 minutes until crisp, rather than microwaving.
Conclusion
I hope this recipe tempts you to try your hand at small, shareable fried blooms—there’s a lot of joy in the theatrics of slicing an onion into a flower and watching it transform in the oil. If you liked the playful format and want another small-batch bloomin’ onion idea with different seasoning and technique, check out this inventive take on baby bloomers: Baby Blooming Onions | Spoon Fork Bacon. For a different commercial-style mini-bloom approach and recipe notes from another test kitchen, read this concise variation: Honey, I Shrunk the Bloomin’ Onion – Epicurious.
If you make these, please share your photos and any creative twists in the comments—I love seeing how readers make recipes their own. Happy frying!


